

Italian Walnut Cookies Recipe: Gluten-Free, Dairy-Free, and Ready in 20 Minutes
1. Introduction
Imagine biting into a cookie that’s light and crumbly on the outside, yet irresistibly soft and chewy on the inside. Italian walnut cookies deliver exactly that! These delightful treats are naturally gluten-free and dairy-free, made with only three simple ingredients. The best part? You can whip them up in just 20 minutes! Whether you’re hosting a dinner party, looking for a last-minute dessert, or simply craving something sweet, these cookies are the perfect choice.
2. What Are Italian Walnut Cookies?
Italian walnut cookies, also known as biscotti di noci, are traditional treats reminiscent of classic amaretti cookies. Originating from Italy, these cookies boast a light, airy texture and a naturally nutty flavor. Unlike many cookie recipes, they don’t rely on flour or butter, making them naturally gluten-free and dairy-free. Their simplicity and elegance make them a favorite in Italian households, especially during festive occasions.
3. Why You’ll Love These Cookies
- Quick and Easy: Just three main ingredients and 20 minutes from start to finish.
- Naturally Gluten-Free and Dairy-Free: Perfect for guests with dietary restrictions.
- Delicious Texture: Crispy on the outside, soft and chewy on the inside.
- Perfect for Gifting: These cookies make a beautiful homemade gift for holidays or special occasions.
- Versatile: You can customize them with chocolate, caramel, or coffee flavors.

4. Key Ingredients
You only need three core ingredients to make these delightful cookies:
- Egg Whites: Two medium-large egg whites create the light and airy texture.
- Walnuts: Ground walnuts provide a rich, nutty flavor. Toasting them beforehand enhances their aroma.
- Sugar: Powdered sugar is ideal, but superfine raw cane sugar works well too.
- Optional: A teaspoon of fresh orange zest adds a vibrant citrusy note.
5. Ingredient Substitutions and Variations
Want to mix things up? Here are some delicious variations:
- Chocolate Chips: Add a handful of chocolate chips to the dough.
- Sea Salt Caramel: Add a small indent on each cookie, fill with caramel, and sprinkle with sea salt.
- Coffee Flavor: Stir in ½ teaspoon of instant coffee powder for a subtle kick.
- Vanilla Essence: Add ½ teaspoon of pure vanilla extract for a classic flavor twist.
This Italian walnut cookie recipe is the perfect example that you don’t need a long list of ingredients to whip up a delicious Italian dessert!
All you need to make them is three ingredients:
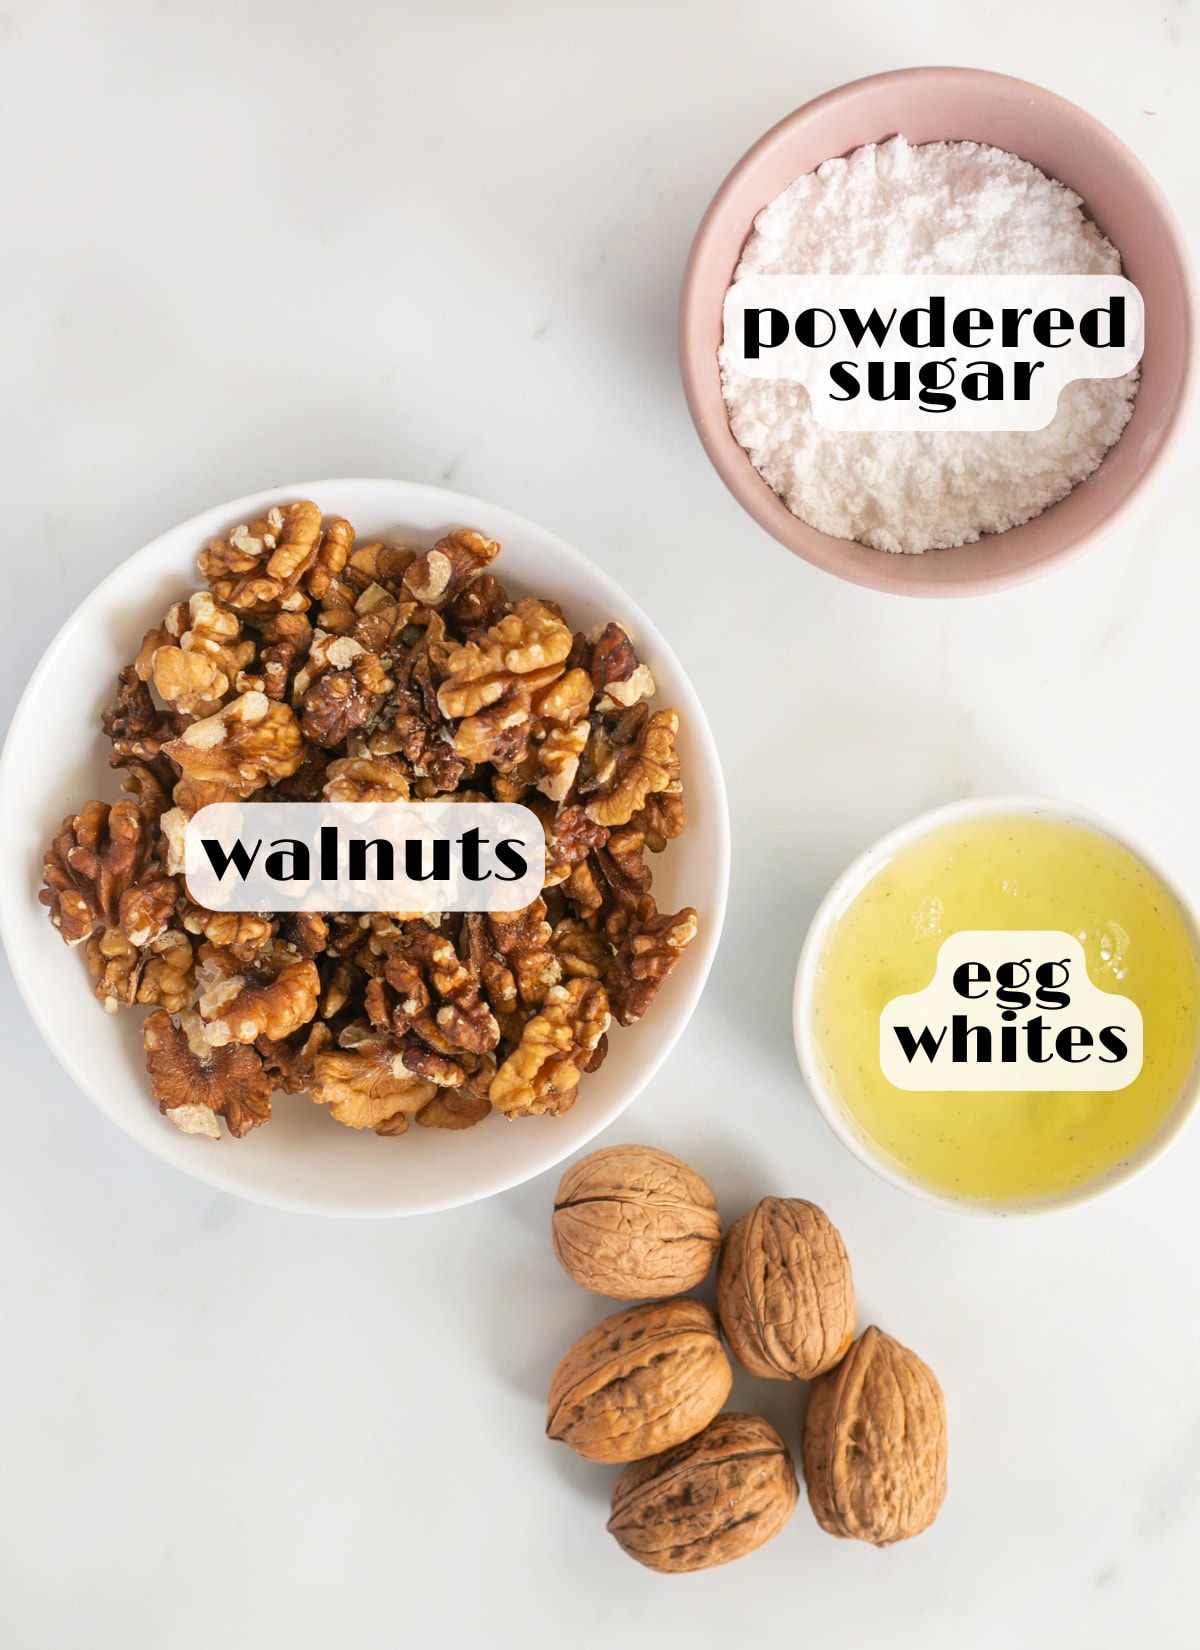
- Eggs: You’ll need two medium-large egg whites.
- Walnuts: It’s optional, but to bring out their delicious nutty aroma, I recommend roasting the walnuts before using them in this cookie recipe.
- Sugar: Use powdered sugar for this recipe. Super fine raw cane sugar will also work great in this recipe.
- Orange: It’s optional, but for a vibrant citrusy note, I recommend adding 1 teaspoon of fresh orange zest.
VARIATIONS
- Chocolate: Add chocolate chips into the cookie dough, or drizzle melted dark chocolate over the cookies before serving.
- Sea salt caramel: Make a small indent on each cookie, add sea salt caramel, top with chopped walnuts, then bake the cookies – Delicious!
- Coffee: Add ½ teaspoon of instant coffee powder for a subtle coffee flavor.
- Vanilla: For a light vanilla note, add ½ teaspoon of pure vanilla extract into the cookie dough.
6. Step-by-Step Guide to Making Italian Walnut Cookies
Step 1: Whisk the Egg Whites
- In a large mixing bowl, whisk the egg whites until they turn slightly foamy.
Step 2: Combine Ingredients
- Add ground walnuts, powdered sugar, and orange zest (if using). Mix until you achieve a smooth dough.
Step 3: Shape the Cookies
- Use your hands or a small ice cream scoop to form evenly-sized cookie balls. Flatten them slightly and place them on a baking tray lined with parchment paper.
Step 4: Bake the Cookies
- Preheat your oven to 180°C (360°F).
- Bake for 12 minutes until the edges are slightly crispy but the center remains soft.
- Let them cool on a wire rack.
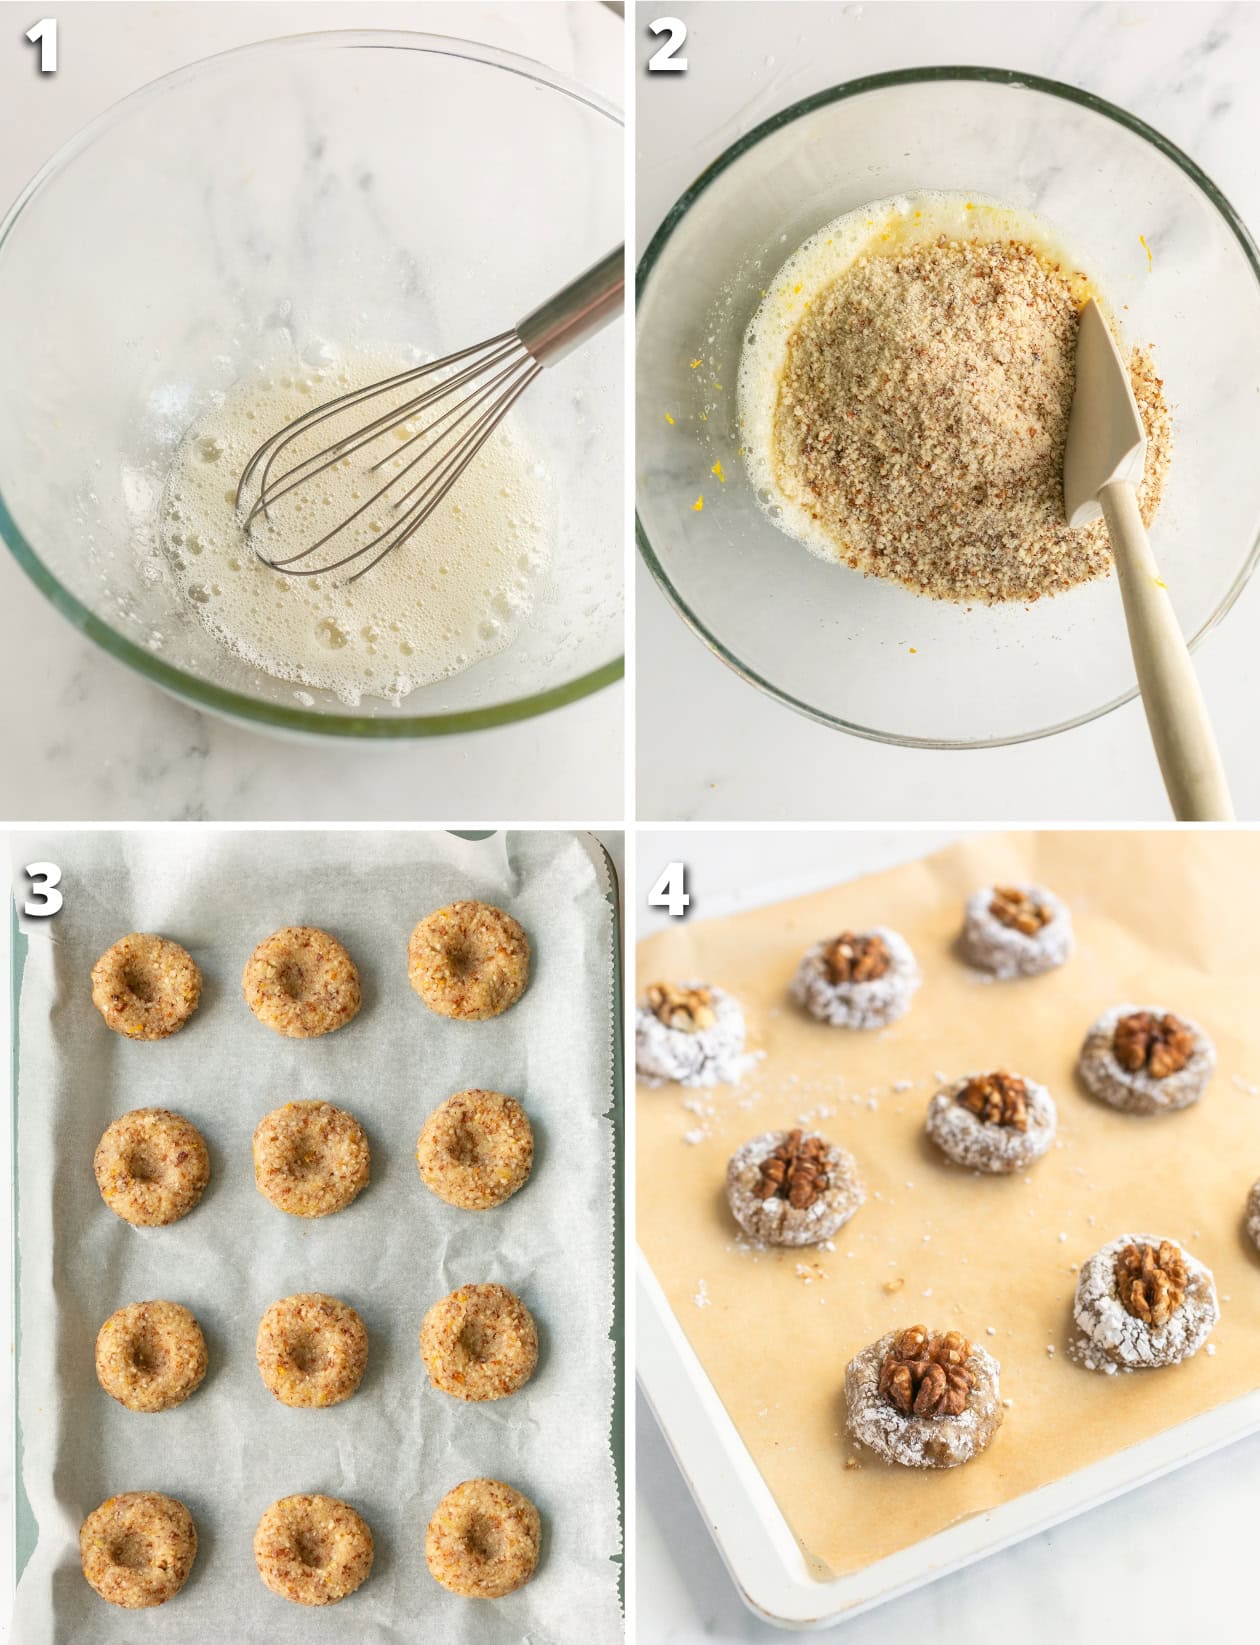
STEP 1. Whisk the egg whites until slightly foamy.
STEP 2. Add ground walnuts, sugar and orange zest (optional) and mix until combined.
STEP 3. Use your hands to form small even balls; flatten them slightly with the palm of your hand, then top each cookie with walnuts (optional).
STEP 4. Bake for 12 minutes. The cookies should still feel quite soft when removed from the oven. Let them cool, sprinkle with powdered sugar and serve.
Baking tips
- For shaping the cookies, you can use a small ice cream scoop; this will help you create evenly-sized cookies.
- If the dough feels really sticky, add more ground walnuts, and dust your hands with powdered sugar before forming the cookie balls.
- Chill the cookie dough balls in the refrigerator for at least 30 minutes. This will help prevent the cookies from flattening or spreading during baking.
- Make sure to let them cool completely on a cooling rack to get that perfect crunchy and chewy texture!
Storage tips
Store the walnut cookies in an airtight container or sealed jar. Keep them in a cool spot in your kitchen or in the fridge for up to a week.
They also freeze super well! Store them in an airtight container, they will keep well in the freezer for up to 1 month.
Whenever needed, thaw them in the fridge overnight, dust with confectioner’s sugar and serve.

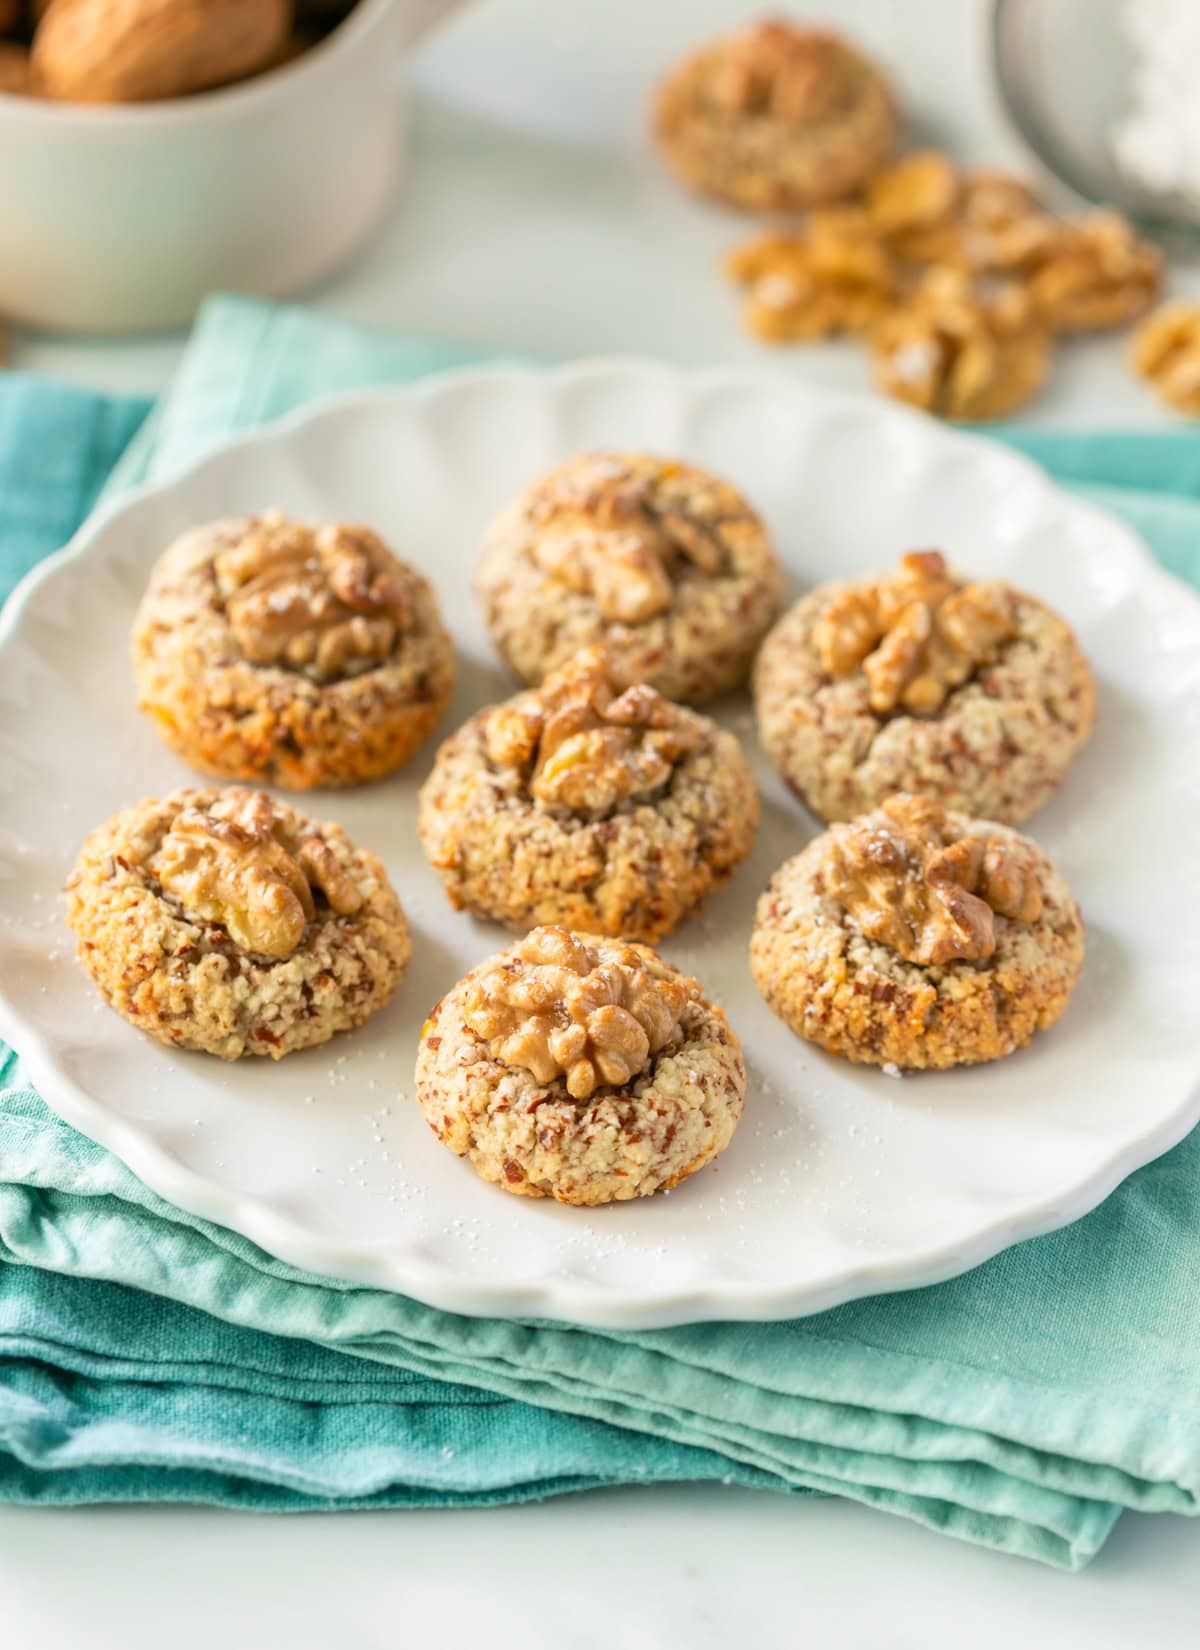
These Italian walnut cookies are naturally gluten-free and dairy-free, and made with only 3 simple ingredients. Best part? They’re ready in 20 minutes!
Ingredients
- 220 g walnuts, + extra for decoration
- 2 egg whites
- 60 g powdered sugar
- 1 teaspoon orange zest, optional
- 1 tablespoon powdered sugar, optional
Instructions
- Place the walnuts into a small food processor or mini food chopper and pulse until very finely ground and set aside until needed.
- In a large bowl, whisk the egg whites until lightly foamy.
- Add the powdered sugar, ground walnuts and orange zest (if using) and mix until completely combined into a smooth dough.
- Use your hands or an ice cream scoop to form small even balls. The mixture should be sticky but fairly firm, and the dough balls should hold their shape when placed on the baking tray. If the dough is very sticky, add extra ground walnuts, and dust your hands in powdered sugar, then form the cookie dough balls.
- Place the cookie balls on a baking sheet covered with parchment paper.
- Use your thumb or a teaspoon to slowly press an indent into the cookie. Top each cookie with half a walnut or chopped walnuts.
- Transfer the cookies to the refrigerator and refrigerate for at least 30 minutes.
- Preheat oven to 180°C/360°F and arrange the baking tray onto the middle shelf of the oven.
- Transfer the cookies to the oven and bake them for 12 minutes. The cookies should have a slightly crispy surface, and should still feel quite soft when removed from the oven.
- Transfer the Italian walnut cookies to a cooling rack and allow them to cool completely, then sprinkle them with powered sugar and serve.
Frequently Asked Questions (FAQs)
1. Can I use other nuts instead of walnuts?
Yes! Almonds, hazelnuts, or pecans can be used as a substitute, but the flavor profile will change slightly.
2. How do I prevent cookies from being too dry?
Avoid overbaking and remove the cookies while they are still slightly soft in the center.
3. Can I add chocolate drizzle on top?
Absolutely! Melt dark or milk chocolate and drizzle it over the cooled cookies for an extra indulgent touch.
4. How long can I store these cookies?
You can store them in an airtight container at room temperature for up to a week or freeze them for up to a month.
5. Do I need to roast the walnuts before using them?
Roasting walnuts enhances their nutty aroma, but it’s completely optional.
15. Conclusion
Italian walnut cookies are a delightful combination of simplicity, flavor, and texture. Whether you’re whipping them up for a festive occasion, giving them as a gift, or simply enjoying them with a hot drink on a quiet afternoon, these cookies are sure to impress. With their naturally gluten-free and dairy-free profile, they cater to a variety of dietary needs without compromising on taste.
So, roll up your sleeves, preheat that oven, and treat yourself to these irresistible Italian delights. Once you’ve tasted them, they’ll become a staple in your dessert repertoire.